
DIY: Wheel Painting.
5 posters
Page 1 of 1

DIY: Wheel Painting.
![]() BOWERS Sun Jan 20, 2008 12:50 am
BOWERS Sun Jan 20, 2008 12:50 am
Materials
· Paint stripper + brush (that withstands the stripper)
· Wire brush
· Sandpaper (120-2000grit)
· Scuff pad
· Primer (optional)
· Paint
· Clearcoat
· Gloves
· Masking tape
· Blue shop towel
· Tack cloth
· Acetone
· Sanding Mask
· Spray can gun adapter (optional)
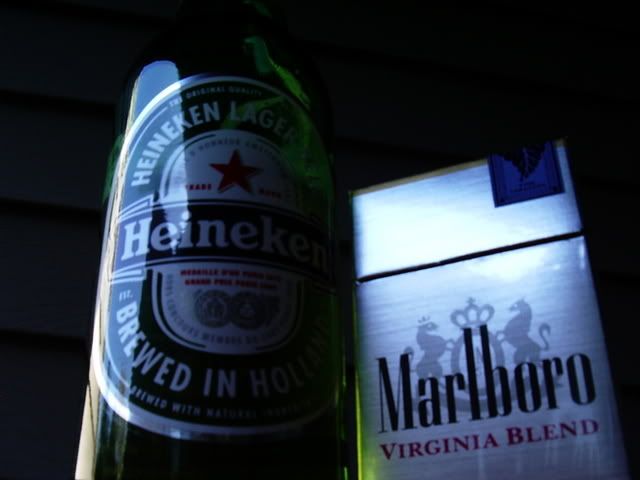
· Beer (optional)
· TIME AND PATIENCE
Some materials are not pictured
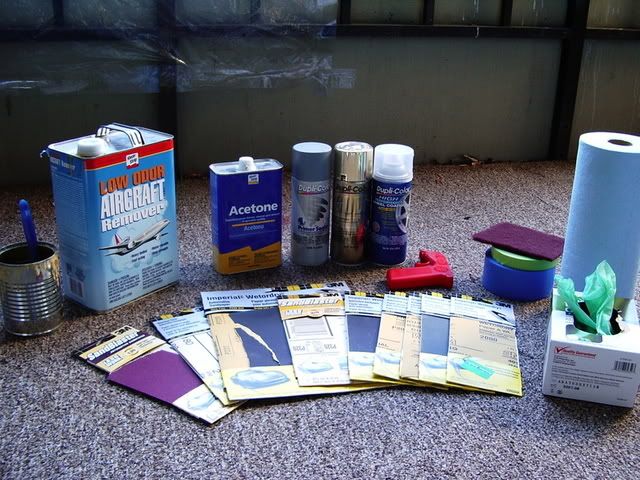
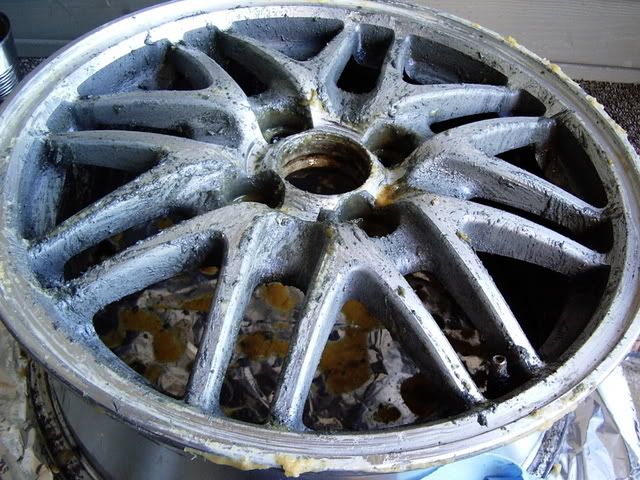
Wheel (OEM Integra)
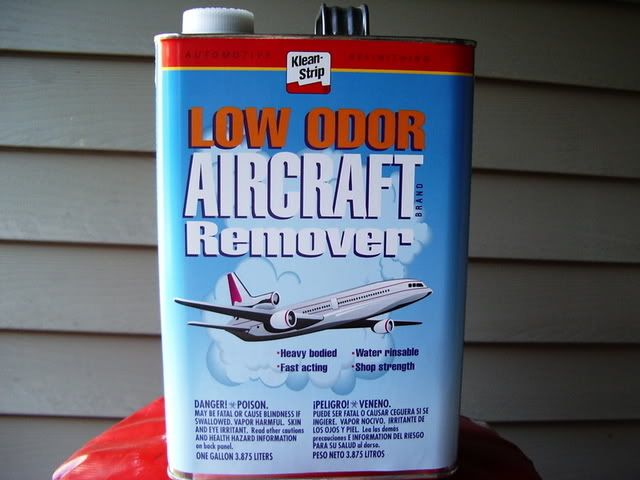
Paint stripper (BIG container, not spray can)
READ THE INSTRUCTIONS ON PAINT STRIPPER BEFORE USE
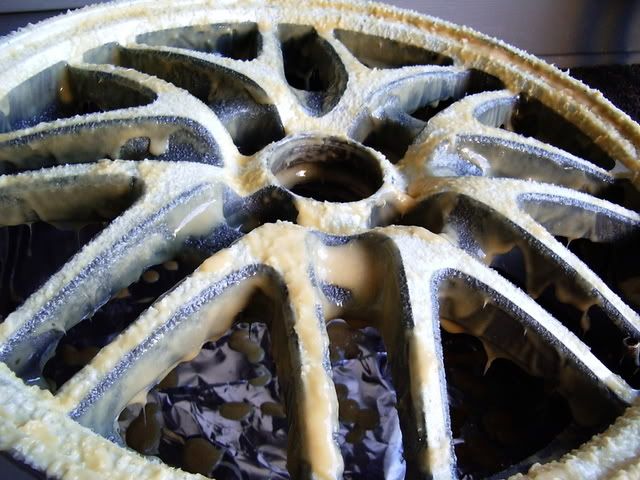
Step One: Strip
Removing existing paint and clearcoat on wheel
PROTECT EYES AND SKIN FROM PAINT STRIPPER AT ALL TIMES
1. Pour the paint stripper in a metal can (I used a soup can). Dip the brush in can.
Start applying the stripper slowly with brush. DO NOT RUSH THIS STEP
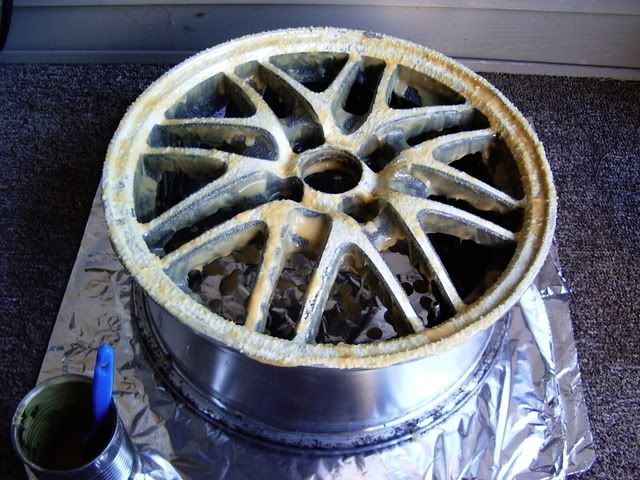
2. The paint and clearcoat should start bubbling up shortly.
3. Set a timer to 20 minutes.
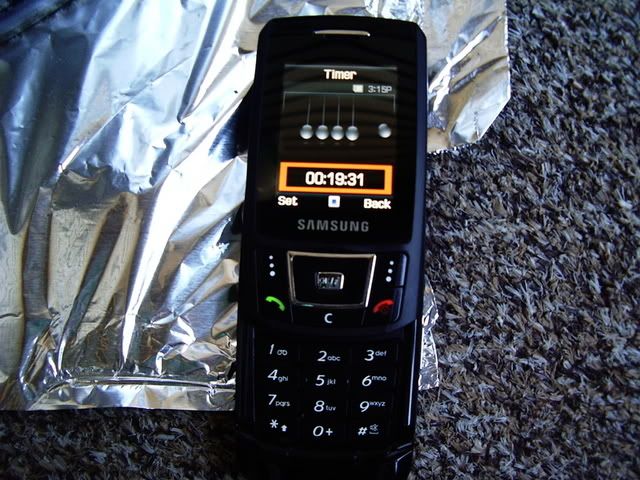
4. While you wait......
Step Two: Scrub
Scrubbing off paint and clearcoat. This will ensure you not to repeat step one.
PROTECT EYES AND SKIN FROM PAINT STRIPPER AT ALL TIMES
1. Grab a wire brush (I used stainless steel)
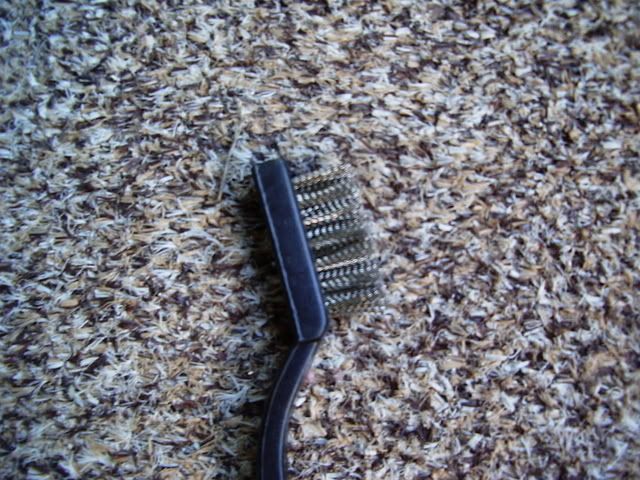
2. Start scrubbing. Watch your eyes!!
3. Pressure wash off the remaining residue and air dry.
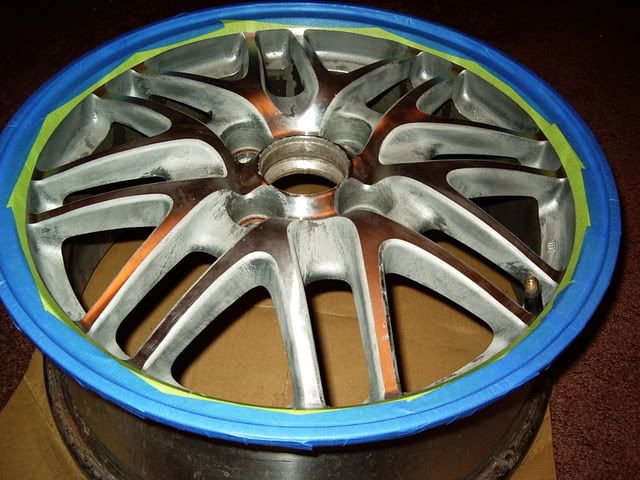
Step Three: Sand
Sanding down area that you wish to polish. Skip this step if you do not wish to polish.
1. Dry sand starting with 120 or 180grit if you have deep scratches and/or curb marks. If there is no damage start from 220grit. Work your way up to 320, 400, 600.
Here's how it looks after 120-400 (I sanded the lip only)
2. Wet sand starting with 600grit working up to 800, 1000, 1500, 2000. Use lots of water.
After wet sanding...
Step Four: Prep
Masking down area that will not be painted and scuffing.
1. Mask the area you polished and/or you do not wish to paint by using masking tape (I used green and blue, both by 3M)
2. Scuff down the area that will be painted with a scuffing pad. Take your time and make sure surface looks even.
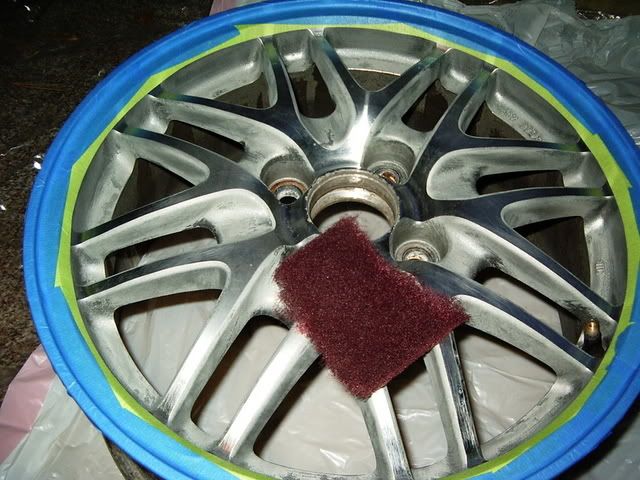
3. Slightly wet 1/8 of a blue shop towel with acetone and start wiping down the scuffed area. Finally, wipe down with tack cloth to get every last piece of lint the towel left off.

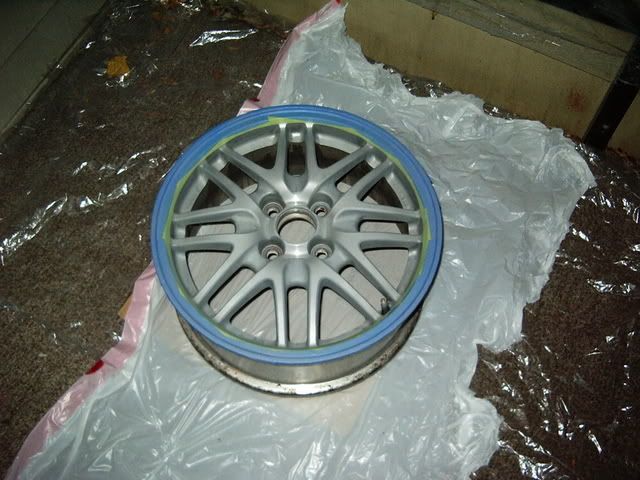
Step Five: Primer
Spraying primer(optional). If you do not wish to use primer you may skip to the next step. You can use sandable primer, primer sealer, etc...
1. Make sure all surroundings are covered/masked unless you do not mind paint everywhere. Spray light coats. The first coat of primer should not fully cover the wheel.
After first coat of primer (I used primer sealer).
2. Wait 5 minutes, spray second coat. Again, lightly.
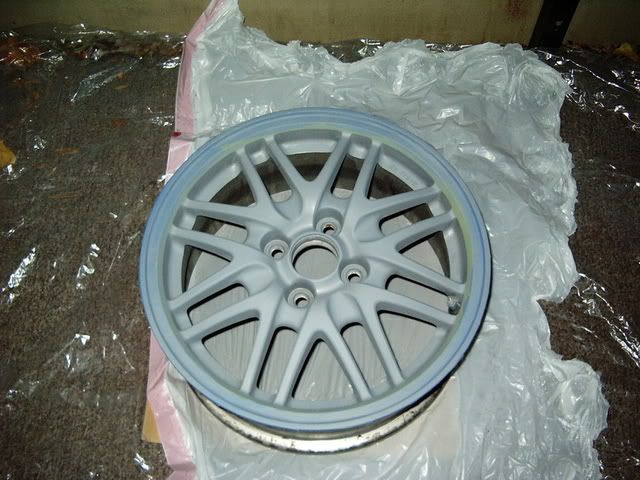
3. Wait 5 minutes, by now you can see the wheel is almost fully covered expect a few spots (depending on design of wheel). Lay down final coat of primer.

4. Let the wheel sit for about 15-20 minutes. If you used sandable primer, you may sand it down after it dries.
Step Six: Spray
Spraying paint and clearcoat.
1. Lay down first coat of paint. Several light coats to avoid runs and overspray. Spray in a sweeping motion (While pulling trigger move left, release. While pulling trigger move right, release. Repeat.)
After first coat..
2. Wait 10 minutes, lay down second coat.
3. Wait 10 minutes, lay down third coat.
4. Wait 10 minutes, inspect. At this point, if the wheel is evenly covered with paint you may stop and let it dry. If not, lay down another coat and call it final.
5. After final coat, color should look even across the wheel. Let it dry for 30 minutes before laying down clear.
While you wait..........
6. Lay down clearcoat just like painting. But you may use several medium coats instead of light coats to pull out more shine. Don't go crazy with it!!
(Sorry, no pictures of spraying clear)
Step Seven: Dry
Drying your work. Most overlooked process when painting at home. Failure to proper drying may result in repeating a lot of work.
1. After the final coat of clear, let it sit about 30 minutes before you transfer them to a cleaner safer place to air dry overnight.

2. Dry it overnight indoors.
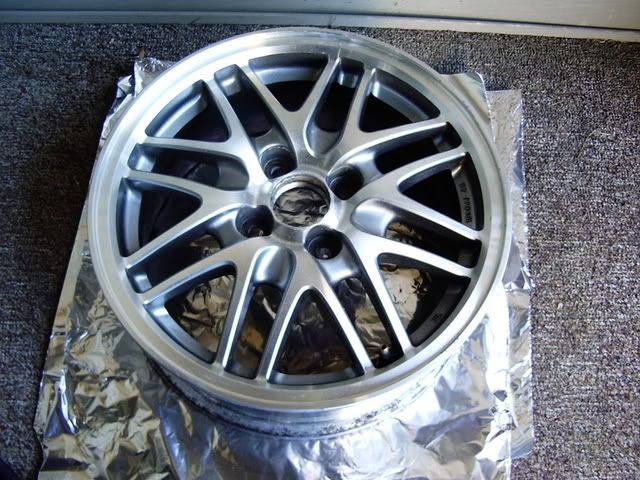
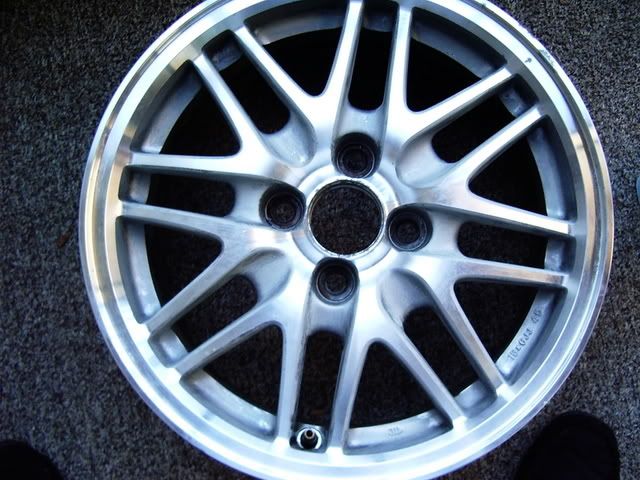
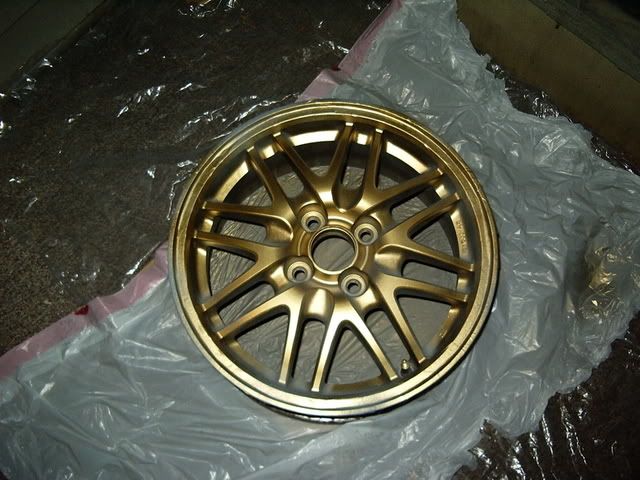
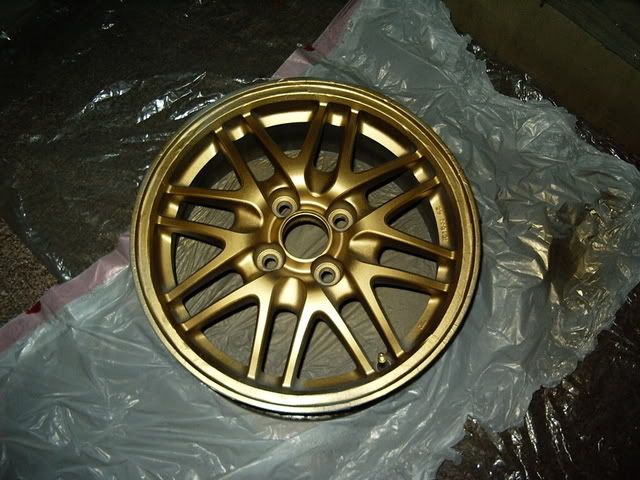
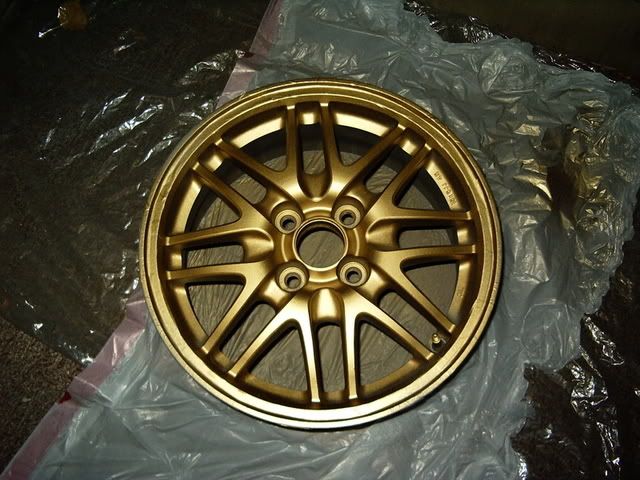
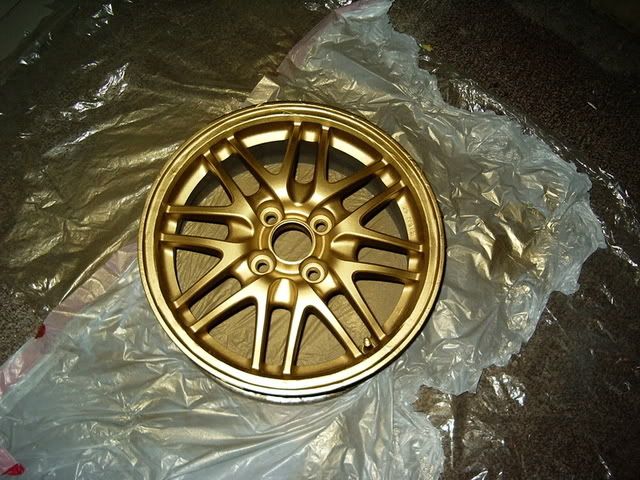
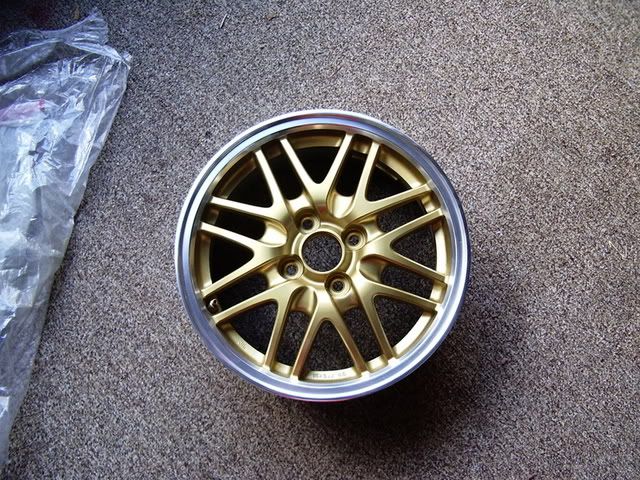
Step Eight: Final Outcome
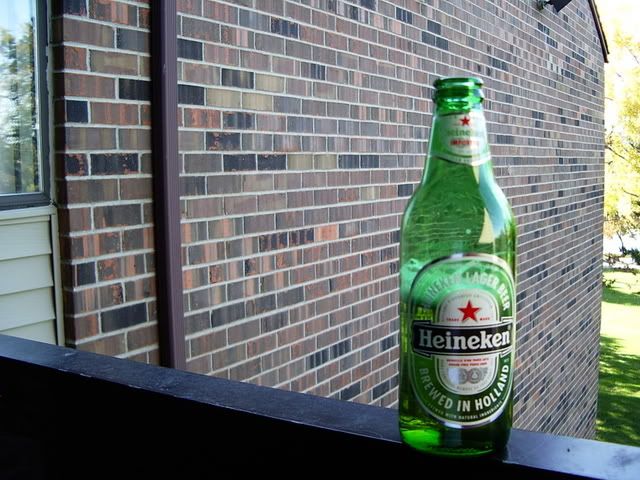
Inspect for damage and flaws under the sun. If you satisfied with the results, kickback, grab a beer, a blunt, a dutch, a L, a joint, whatever you want, and admire your work. Just don't forget you got 3 more to go.
1. Pull off the masking tape slowly. Be paitent!!!
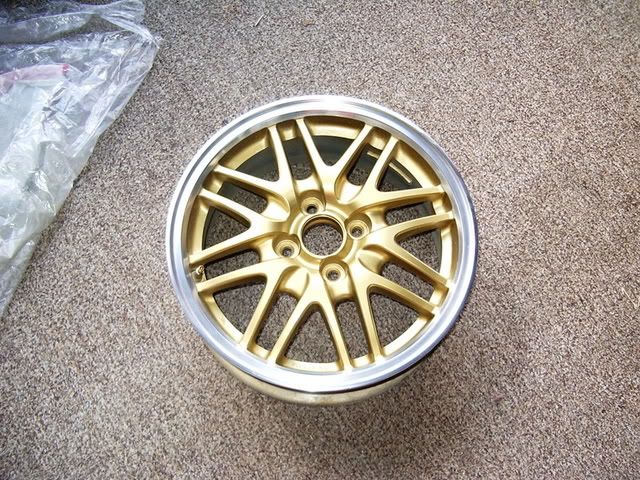
Mmmhmmm
Optional Step: Polish
If you want that polished area to really shine, metal polish (mother's stuff works great), a polisher and/or power mini ball. Buff it up. Read instructions on metal polish.
Optional Step: Shine
Now you polished the metal so good the paint starting to look dull?
You can wet sand your clearcoat with 1500-2000grit sand paper to get a smooth even texture on the painted area. You can also polish the painted area with a rubbing compound, polishing compound, followed by wax.
This is not required but you may do it down the road once the paint fully cures. Give it about 2-3 weeks.
I didn't do the optional steps since these wheels are going to be hitting snow and salt 24/7.
As long as you have some common sense and know how to read, this job won't be a problem. Hope this helps the folks that PM'd me about this info.
Maintenance
Poor maintenance can make your wheels look worthless real quick.
For the first week just wash them down with low pressure water.
After that, wash your wheel separately when you wash your ride.
I use soap water but you can use your favorite wheel cleaner.
SOAK IT, BUT DON'T LET THE CLEANER/SOAP DRY OUT
You may start buffing after they dry.
For painted areas,
pick your favorite rubbing compound and/or polishing compound followed by wax.
For polished areas,
pick your favorite metal polish followed by wax.
Polishing might not be necessary for every car wash.
You can re-polish them once a month or whenever they get dirty or dull.
Both buffing steps can be done by hand but I recommend a buffer/polisher and powerball mini (works great on lips) for the best results.
· Paint stripper + brush (that withstands the stripper)
· Wire brush
· Sandpaper (120-2000grit)
· Scuff pad
· Primer (optional)
· Paint
· Clearcoat
· Gloves
· Masking tape
· Blue shop towel
· Tack cloth
· Acetone
· Sanding Mask
· Spray can gun adapter (optional)
· Beer (optional)
· TIME AND PATIENCE
Some materials are not pictured
Wheel (OEM Integra)
Paint stripper (BIG container, not spray can)
READ THE INSTRUCTIONS ON PAINT STRIPPER BEFORE USE
Step One: Strip
Removing existing paint and clearcoat on wheel
PROTECT EYES AND SKIN FROM PAINT STRIPPER AT ALL TIMES
1. Pour the paint stripper in a metal can (I used a soup can). Dip the brush in can.
Start applying the stripper slowly with brush. DO NOT RUSH THIS STEP
2. The paint and clearcoat should start bubbling up shortly.
3. Set a timer to 20 minutes.
4. While you wait......
Step Two: Scrub
Scrubbing off paint and clearcoat. This will ensure you not to repeat step one.
PROTECT EYES AND SKIN FROM PAINT STRIPPER AT ALL TIMES
1. Grab a wire brush (I used stainless steel)
2. Start scrubbing. Watch your eyes!!
3. Pressure wash off the remaining residue and air dry.
Step Three: Sand
Sanding down area that you wish to polish. Skip this step if you do not wish to polish.
1. Dry sand starting with 120 or 180grit if you have deep scratches and/or curb marks. If there is no damage start from 220grit. Work your way up to 320, 400, 600.
Here's how it looks after 120-400 (I sanded the lip only)
2. Wet sand starting with 600grit working up to 800, 1000, 1500, 2000. Use lots of water.
After wet sanding...
Step Four: Prep
Masking down area that will not be painted and scuffing.
1. Mask the area you polished and/or you do not wish to paint by using masking tape (I used green and blue, both by 3M)
2. Scuff down the area that will be painted with a scuffing pad. Take your time and make sure surface looks even.
3. Slightly wet 1/8 of a blue shop towel with acetone and start wiping down the scuffed area. Finally, wipe down with tack cloth to get every last piece of lint the towel left off.
Step Five: Primer
Spraying primer(optional). If you do not wish to use primer you may skip to the next step. You can use sandable primer, primer sealer, etc...
1. Make sure all surroundings are covered/masked unless you do not mind paint everywhere. Spray light coats. The first coat of primer should not fully cover the wheel.
After first coat of primer (I used primer sealer).
2. Wait 5 minutes, spray second coat. Again, lightly.
3. Wait 5 minutes, by now you can see the wheel is almost fully covered expect a few spots (depending on design of wheel). Lay down final coat of primer.
4. Let the wheel sit for about 15-20 minutes. If you used sandable primer, you may sand it down after it dries.
Step Six: Spray
Spraying paint and clearcoat.
1. Lay down first coat of paint. Several light coats to avoid runs and overspray. Spray in a sweeping motion (While pulling trigger move left, release. While pulling trigger move right, release. Repeat.)
After first coat..
2. Wait 10 minutes, lay down second coat.
3. Wait 10 minutes, lay down third coat.
4. Wait 10 minutes, inspect. At this point, if the wheel is evenly covered with paint you may stop and let it dry. If not, lay down another coat and call it final.
5. After final coat, color should look even across the wheel. Let it dry for 30 minutes before laying down clear.
While you wait..........
6. Lay down clearcoat just like painting. But you may use several medium coats instead of light coats to pull out more shine. Don't go crazy with it!!
(Sorry, no pictures of spraying clear)
Step Seven: Dry
Drying your work. Most overlooked process when painting at home. Failure to proper drying may result in repeating a lot of work.
1. After the final coat of clear, let it sit about 30 minutes before you transfer them to a cleaner safer place to air dry overnight.
2. Dry it overnight indoors.
Step Eight: Final Outcome
Inspect for damage and flaws under the sun. If you satisfied with the results, kickback, grab a beer, a blunt, a dutch, a L, a joint, whatever you want, and admire your work. Just don't forget you got 3 more to go.
1. Pull off the masking tape slowly. Be paitent!!!
Mmmhmmm
Optional Step: Polish
If you want that polished area to really shine, metal polish (mother's stuff works great), a polisher and/or power mini ball. Buff it up. Read instructions on metal polish.
Optional Step: Shine
Now you polished the metal so good the paint starting to look dull?
You can wet sand your clearcoat with 1500-2000grit sand paper to get a smooth even texture on the painted area. You can also polish the painted area with a rubbing compound, polishing compound, followed by wax.
This is not required but you may do it down the road once the paint fully cures. Give it about 2-3 weeks.
I didn't do the optional steps since these wheels are going to be hitting snow and salt 24/7.
As long as you have some common sense and know how to read, this job won't be a problem. Hope this helps the folks that PM'd me about this info.
Maintenance
Poor maintenance can make your wheels look worthless real quick.
For the first week just wash them down with low pressure water.
After that, wash your wheel separately when you wash your ride.
I use soap water but you can use your favorite wheel cleaner.
SOAK IT, BUT DON'T LET THE CLEANER/SOAP DRY OUT
You may start buffing after they dry.
For painted areas,
pick your favorite rubbing compound and/or polishing compound followed by wax.
For polished areas,
pick your favorite metal polish followed by wax.
Polishing might not be necessary for every car wash.
You can re-polish them once a month or whenever they get dirty or dull.
Both buffing steps can be done by hand but I recommend a buffer/polisher and powerball mini (works great on lips) for the best results.

BOWERS- Track Whore and Admin
-
 Number of posts : 226
Age : 43
Location : LINCOLN
Registration date : 2008-01-08 -


Kries- Admin
- Number of posts : 209
Age : 34
Location : Nebraska
Registration date : 2008-01-08 -
Re: DIY: Wheel Painting.
![]() Eric Sun Jan 20, 2008 12:45 pm
Eric Sun Jan 20, 2008 12:45 pm
thats sick, you could probably sell them for a grand with tires...

Eric- Moder-Hater
- Number of posts : 96
Age : 35
Location : Cincinnati, OH
Registration date : 2008-01-12
Re: DIY: Wheel Painting.
![]() 1996hondacivic Wed Jan 23, 2008 12:36 am
1996hondacivic Wed Jan 23, 2008 12:36 am
yay on the smokes and awesome wheels
1996hondacivic- Number of posts : 20
Registration date : 2008-01-13
Re: DIY: Wheel Painting.
![]() BOWERS Wed Jan 23, 2008 12:50 am
BOWERS Wed Jan 23, 2008 12:50 am
yeah...beer...I don't smoke but my friend Sam does.... 
BOWERS- Track Whore and Admin
- Number of posts : 226
Age : 43
Location : LINCOLN
Registration date : 2008-01-08 -
SyLee Duk- Number of posts : 1
Registration date : 2008-03-16
Page 1 of 1
Permissions in this forum:
You cannot reply to topics in this forum|
|
|